| Headlines News Widget For Blogger With Tooltips Posted: 23 Jan 2017 11:28 AM PST Headlines News Widget is an awesome, super lightweight plugin for Blogger blogs, which shows headlines of your recent posts as a scrolling text, floating from left to right. It's a horizontal auto scrolling recent posts widget for blogger that is responsive and automatic. It's built using Blogger JSON Feeds API and jQuery News Ticker plugin.  Scrolling headline news widget surely makes your introductory texts standout and noticeable as soon as a visitor lands on your blog. It's the best way to draw visitors attraction towards your featured content. Scrolling headline news widget surely makes your introductory texts standout and noticeable as soon as a visitor lands on your blog. It's the best way to draw visitors attraction towards your featured content.
What is a Headlines News Widget For Blogger? Headlines News widget is basically a news ticker plugin which shows latest headlines of your blogspot blog as a horizontal scrolling text. It's the first news ticker of its kind for blogger blogs that does not only display your title links like ordinary tickers found across the web but also shows post info such as: - Author Name
- Author Avatar
- Comments Link
- Comments Count
- Published Date
- Featured Thumbnail
- Post description/summary snippet
[Desktop View] 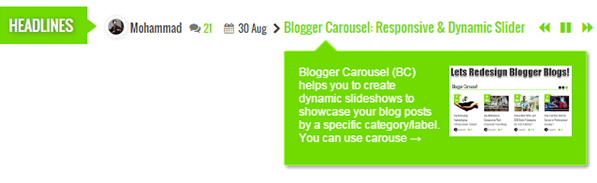
You can choose to display recent posts by label by specifying a particular category or you can simply choose to show latest posts. It can easily be customized to change its background colors and fonts. Headline news widget is mobile responsive and fits perfectly to different screen sizes. [Mobile View] 
We have already released its simplest version but today we will add some more features to it like CSS3 tooltips to display description and featured image. To add a simple news gadget for blogger without tooltips then please check the following tutorial: If in case you want a simple news widget to display text, custom html or even RSS/Atom feed then try our jQuery Announcement widget, where you can display headline news in vertical scroll. Is Headlines News Ticker Standards-Compliant? Headlines News ticker widget uses CSS and jQuery to create the scrolling text animation. It does not uses the <marquee> tag. We are using standards-compliant jQuery script and CSS3 to make the text scroll across the screen. The text animation is controlled used navigation such as play/pause and Next/Previous buttons, which makes it really easy for website visitors to navigate between scrolling headlines. 
The marquee tag is a non-standard HTML element which causes text to scroll up, down, left or right automatically. This feature is obsolete now and its use is discouraged by W3C. Features of Headlines News Widget Headlines News Ticker is an advanced widget equipped with these features: - Author Avatar
- Displays latest posts dynamically
- Displays recent posts from a specific category/label
- Tooltips support
- Shows Post Description/Summary
- Shows Featured Thumbnail Image
- Scrolling text with two animations: reveal & fade
- Clickable Comments Count
- Custom Date Format
- Title Length is adjustable
- Fully Customizable - Multi Colors!
- Responsive and mobile friendly
- Controls Navigation. Play/Pause, Next/Previous
- Support all browsers: Firefox, Chrome, IE, Safari etc.
| Headlines News Widget Specs | | Created | Dec 10, 2016 | | Last Update | Jan 23, 2017 | | Compatible Browsers | IE9, IE10, IE11, Firefox, Safari, Opera, Chrome, Edge | | Technology Used | JSON, CSS3, HTML4, jQuery, JavaScript | | Layout | Mobile Responsive | | Platform Support | Google Blogger 1.0 | | Text Direction | LTR | How To add Headlines News Widget In Blogger? Follow these easy steps: - Go To Blogger > Template
- Backup your template
- Click "Edit HTML"
- Just below
<head> tag paste the following JS and CSS source links: <link href='http://fortawesome.github.io/Font-Awesome/assets/font-awesome/css/font-awesome.css' rel='stylesheet'/>
<link href='http://fonts.googleapis.com/css?family=Oswald' rel='stylesheet' type='text/css'/> - Next search
]]></b:skin> and just above it paste the following code: /*--------------Headlines News Widget By MyBloggerTricks.com----------*/ .ticker-wrapper.has-js{margin:20px 0;padding:0 20px;width:780px;height:32px;display:block;-webkit-border-radius:15px;-moz-border-radius:15px;border-radius:15px;background-color:#f8f0db;font-size:.75em}
.ticker{width:710px;height:23px;display:block;position:relative;overflow:hidden;background-color:#f8f0db}
.ticker-title{padding-top:9px;color:#900;font-weight:700;background-color:#f8f0db;text-transform:uppercase}
.ticker-content{margin:0;padding-top:9px;position:absolute;color:#1F527B;font-weight:700;background-color:#f8f0db;overflow:hidden;white-space:nowrap;line-height:1.2em}
.ticker-content a{text-decoration:none;color:#1F527B}
.ticker-content a:hover{text-decoration:underline;color:#0D3059}
.ticker-swipe{padding-top:9px;position:absolute;top:0;background-color:#f8f0db;display:block;width:800px;height:23px}
.ticker-swipe span{margin-left:1px;background-color:#f8f0db;border-bottom:1px solid #1F527B;height:12px;width:7px;display:block}
.ticker-controls{padding:8px 0 0;list-style-type:none;float:left}
.ticker-controls li{padding:0;margin-left:5px;float:left;cursor:pointer;height:16px;width:16px;display:block}
.ticker-controls li.jnt-play-pause{background-image:url(../images/controls.png);background-position:32px 16px}
.ticker-controls li.jnt-play-pause.over{background-position:32px 32px}
.ticker-controls li.jnt-play-pause.down{background-position:32px 0}
.ticker-controls li.jnt-play-pause.paused{background-image:url(../images/controls.png);background-position:48px 16px}
.ticker-controls li.jnt-play-pause.paused.over{background-position:48px 32px}
.ticker-controls li.jnt-play-pause.paused.down{background-position:48px 0}
.ticker-controls li.jnt-prev{background-image:url(../images/controls.png);background-position:0 16px}
.ticker-controls li.jnt-prev.over{background-position:0 32px}
.ticker-controls li.jnt-prev.down{background-position:0 0}
.ticker-controls li.jnt-next{background-image:url(../images/controls.png);background-position:16px 16px}
.ticker-controls li.jnt-next.over{background-position:16px 32px}
.ticker-controls li.jnt-next.down{background-position:16px 0}
.js-hidden{display:none}
.no-js-news{padding:10px 0 0 45px;color:#F8F0DB}
.left .ticker-controls,.left .ticker-content,.left .ticker-title,.left .ticker{float:left}
.left .ticker-controls{padding-left:6px}
.right .ticker-controls,.right .ticker-content,.right .ticker-title,.right .ticker{float:right}
.right .ticker-controls{padding-right:6px}
/*########Default Style by MBT#########*/
.ticker-wrapper.has-js{margin:0 0 -200px;padding:0;width:98%;min-height:242px;display:block;border-radius:0;background-color:#fff;border:0 solid #eee;font-size:12px;overflow:hidden}
.ticker{width:80%;height:42px;display:block;position:relative;overflow:visible;background-color:#fff}
.ticker-title{background:#71db00;padding:9px 10px;color:#FFF;font-size:16px;font-family:oswald;text-transform:uppercase;text-shadow:1px 1px 6px #666}
.ticker-title:after{left:90px;top:10px;height:0;width:0;position:absolute;content:" ";pointer-events:none;margin-left:0;margin-top:1px;border-left:13px solid #71db00;border-top:10px solid transparent;border-bottom:10px solid transparent;-moz-transform:scale(.9999)}
.ticker-content{background-color:#fff;margin-left:18px!important;color:#444;margin-top:1px!important;overflow:visible!important; padding-top: 2px!important;}
.ticker-swipe{background-color:#fff;position:relative;top:6px;left:110px!important}
.ticker-swipe span{margin-left:1px;background-color:#fff;border-bottom:1px solid #333;height:12px;width:7px}
.ticker-controls{padding: 0px!important;margin: 17px 0 0 10px!important;list-style-type:none;position:relative;right:-50px}
.ticker-controls li{padding:0;margin-left:5px;float:left;cursor:pointer;height:16px;width:16px;display:block}
.ticker-controls li a{border:0px!important; padding:0px!important;}
.ticker-controls li.jnt-play-pause,.ticker-controls li.jnt-play-pause.paused,.ticker-controls li.jnt-play-pause.paused.over,.ticker-controls li.jnt-prev,.ticker-controls li.jnt-play-pause.over,.ticker-controls li.jnt-next{position:absolute;background:none}
.ticker-controls li.jnt-play-pause:after,.ticker-controls li.jnt-play-pause.over:after{content:"\f04c";font-size:13px;color:#71db00;font-family:fontAwesome;position:relative;left:1.8em}
.ticker-controls li.jnt-play-pause.paused:after,.ticker-controls li.jnt-play-pause.paused.over:after{content:"\f04b";font-size:13px;color:#71db00;font-family:fontAwesome;position:relative;left:1.8em}
.ticker-controls li.jnt-prev:after{content:"\f04a";font-size:13px;color:#71db00;font-family:fontAwesome;position:relative;left:0}
.ticker-controls li.jnt-next:after{content:"\f04e";font-size:13px;color:#71db00;font-family:fontAwesome;position:relative;left:3.6em}
.ticker .iauthor:before, .ticker .icomments:before, .ticker .idate:before{font-family:fontAwesome;position:relative;padding-right:8px;color:#fff}
.ticker .iauthorpic{width:17px!important;height:17px!important;border-radius:50%;float:none;display:inline-block!important;margin-right:3px;position:relative;
top: 6px;border: 1px solid #eeeeee;
-moz-box-shadow: 1px 1px 5px rgba(0, 0, 0, .1);
-webkit-box-shadow: 1px 1px 5px rgba(0, 0, 0, .1);
box-shadow: 1px 1px 5px rgba(0, 0, 0, .1);
padding: 3px;
}
.ticker span {padding-right:5px; font-family:Oswald; font-weight:normal}
.ticker .icomments a{color:#71db00;font-size:11px}
.ticker .icomments a:hover{text-decoration:underline}
.ticker .icomments:before{content:'\f086';padding:0 3px 0 0px;color:#777;position:relative; top:-1px}
.ticker .idate{font-size:11px;padding-right:7px;}
.ticker .idate:before{content:'\f073';padding:0 5px;color:#777; position:relative; top:-1px}
.ticker .mbttitle{font-family:oswald;font-size:14px;color:#71db00!important;font-weight:400;text-decoration:none;}
.ticker .mbttitle:hover{text-decoration:underline} /*------ CSS3 Tooltip by MBT -------------*/
.ticker .tooltip{outline:none;text-decoration:none!important;position:relative}
.ticker .tooltip strong{line-height:30px}
.ticker .tooltip > span{width:290px; white-space: normal; padding:15px 15px 0px 15px;opacity:0;top:170%;visibility:hidden;z-index:10;position:absolute;font-family:Arial;font-size:12px;font-style:normal;border-radius:2px;box-shadow:2px 2px 5px #999;-webkit-transition-property:opacity,margin-top,visibility,margin-left;-webkit-transition-duration:0.4s,0.3s,0.4s,.3s;-webkit-transition-timing-function:ease-in-out,ease-in-out,ease-in-out,ease-in-out;transition-property:opacity,margin-top,visibility,margin-left;transition-duration:0.4s,0.3s,0.4s,.3s;transition-timing-function:ease-in-out,ease-in-out,ease-in-out,ease-in-out}
.ticker .tooltip > span img{float:right;width:130px;margin:0 0 30px 10px;padding: 0;border: none;}
.ticker .tooltip:hover > span{opacity:1;text-decoration:none;visibility:visible;overflow:visible;display:inline;margin-left:0px}
.ticker .tooltip span b{width:15px;height:15px;margin-left:20px;bottom:-9px;display:block;position:absolute;-webkit-transform:rotate(-45deg);-moz-transform:rotate(-45deg);-o-transform:rotate(-45deg);transform:rotate(-45deg);display:none\0/;*display:none}
.ticker .tooltip > span{color:#fff; background:#71db00;border:1px solid #94fb26}
.ticker .tooltip span b{margin-top:-19px;top:10px;background:#71db00;border-top:1px solid #94fb26;border-right:1px solid #94fb26;border-bottom:1px solid #71db00;border-left:1px solid #71db00} @media only screen and (max-width:480px) {
.ticker-content {margin-left: -5px!important;padding-top: 4px!important;}.ticker-title{font-size:10px!important;padding:5px!important;}
.ticker-controls, .ticker .icomments, .ticker .idate, .ticker .iauthor, .ticker .iauthorpic, .ticker-title:after {display:none;}}
Make these custom changes - To change the green color theme of the News Ticker simply replace the green highlighted color codes with color of your choice. Use our Color Code Generator.
- Save your template.
- Now go to Blogger > Layout
- Select "Add a Gadget"
- Choose "HTML/JavaScript" gadget
- Keep the title field empty and then paste the following code inside it:
<!-- ######### Headlines News Widget By MBT ############# --> <script type="text/javascript" src="http://ajax.googleapis.com/ajax/libs/jquery/1.6.0/jquery.min.js"></script>
<script src="http://www.jquerynewsticker.com/includes/jquery.ticker.js" type="text/javascript"></script> <!-- ######### Writing Callback Function ############# -->
<script type="text/javascript">
//----------------------------Defaults
var ListBlogLink = "http://www.mybloggertricks.com";
var ListCount = 5;
var TitleCount = 70;
var ListLabel ="Widgets";
var ChrCount = 140;
var ImageSize = 200; //----------------------------Function Start
function mbtlist(json) {
document.write('<ul id="js-news" class="js-hidden">');
for (var i = 0; i < ListCount; i++)
{ //-----------------------------Variables Declared
var listing= ListImage = ListUrl = ListTitle = ListImage = ListContent = ListConten = ListAuthor = ListTag = ListDate = ListUpdate = ListComments = thumbUrl = TotalPosts = sk = AuthorPic= ListMonth = Y = D = M = m = YY = DD = MM = mm = TT = "";
//----------------------------- Title URL
for (var j = 0; j < json.feed.entry[i].link.length; j++) {
if (json.feed.entry[i].link[j].rel == 'alternate') {
break;
}
}
ListUrl= "'" + json.feed.entry[i].link[j].href + "'";
//----------------------------------- Title Stirng
if (json.feed.entry[i].title!= null)
{
ListTitle= json.feed.entry[i].title.$t.substr(0, TitleCount);
} if (json.feed.entry[i].thr$total)
{
ListComments= "<a href='"+json.feed.entry[i].link[j].href+"#comment-form'>"+json.feed.entry[i].thr$total.$t+"</a>";
}
ListAuthor= json.feed.entry[i].author[0].name.$t.split(" ");
ListAuthor=ListAuthor.slice(0, 1).join(" ");
AuthorPic = json.feed.entry[i].author[0].gd$image.src;
//################### Content Check
ListConten = json.feed.entry[i].content.$t;
ListContent= ListConten.replace(/(<([^>]+)>)/ig,"").substring(0, ChrCount); //################### Date Format ListMonth= ["Jan", "Feb", "Mar", "Apr", "May", "Jun", "Jul", "Aug", "Sep", "Oct", "Nov", "Dec"]; ListDate= json.feed.entry[i].published.$t.substring(0,10); Y = ListDate.substring(0, 4);
m = ListDate.substring(5, 7);
D = ListDate.substring(8, 10);
M = ListMonth[parseInt(m - 1)]; //################### Thumbnail Check
if (json.feed.entry[i].media$thumbnail)
{
thumbUrl = json.feed.entry[i].media$thumbnail.url;
sk= thumbUrl.replace("/s72-c/","/s"+ImageSize+"/");
ListImage= "'" + sk.replace("?imgmax=800","") + "'";
} // YouTube scan
else if (json.feed.entry[i].content.$t.match(/youtube\.com.*(\?v=|\/embed\/)(.{11})/) != null)
{
var youtube_id = json.feed.entry[i].content.$t.match(/youtube\.com.*(\?v=|\/embed\/)(.{11})/).pop();
if (youtube_id.length == 11) {
var ListImage = "'//img.youtube.com/vi/"+youtube_id+"/0.jpg'";
}
}
else if (json.feed.entry[i].content.$t.match(/src=(.+?[\.jpg|\.gif|\.png]")/) != null)
{
// Support For 3rd Party Images
ListImage = json.feed.entry[i].content.$t.match(/src=(.+?[\.jpg|\.gif|\.png]")/)[1];
}
else
{
ListImage= "'https://blogger.googleusercontent.com/img/b/R29vZ2xl/AVvXsEjmHVmKC0KNO5XzkCef8dYzoxertepzPo-eG1uPFbHfkWY4cRvTNRQsBAXpjOYGxHoDa4PDggRaDicuGWobKoQ7fKy2O3Inxd1wu53KrL0WO6CNjQwOApFYISt4Zo3lZQrOfy7FKc8xY0k/s200/Icon.png'";
} //----------------------------------- Printing List
var listing = "<li class='news-item'><span class='iauthor'><img class='iauthorpic' src='"+AuthorPic+"'/>"
+ListAuthor+ "</span> <span class='icomments'>"
+ListComments + "</span> <span class='idate'>"
+ D + " " + M + "</span><i class='fa fa-chevron-right'></i> <a class='mbttitle tooltip' href="
+ListUrl+
"><span><b></b><img src="
+ListImage+
"/>"
+ListContent+
" →</span>"+ListTitle+"</a></li>";
document.write(listing);
}} document.write("</ul><script src='"+ListBlogLink+"/feeds/posts/default/-/"+ListLabel+"?alt=json-in-script&callback=mbtlist'></"+"script>");
/*##########Newsticker settings########*/
$(function () {
$('#js-news').ticker({
speed: 0.20,
controls: true,
titleText: 'Headlines',
displayType: 'reveal',
pauseOnItems: 2000});
});
</script> Make these changes: - ListBlogLink : Insert your Blog URL here
- ListCount : Decide how many headlines do you wish to display.
- TitleCount : Choose how many characters to display in post title length.
- ListLabel : Insert your blog label here. Remember that labels are case sensitive. Therefore type it exactly as it is shown in your browser address bar. News Ticker will not work if label case is not correct.
- ChrCount : Set the length of post description here.
- ImageSize : Set image resolution (aspect ratio) here.
- speed: Edit this value (0.20) to increase or decrease the scroll speed.
- controls: Set true to false if you wish to hide the control buttons i.e. Play/Pause, Next/Previous
- titleText: Set the News Ticker title here from Headlines to anything you like such as Latest, Hottest etc.
- displayType: There are two types of scrolling text animation, reveal or fade. Set it as per your preference.
- If you want to show latest posts headlines of your blog without mentioning any specific label/category then simply remove /-/"+ListLabel+" from the code above.
- Click Save button and you are all done.
Enjoy showing animated plus scrolling news headlines to your visitors! :) Facing Problems Installing Headlines News Widget? I tried keeping these steps as simple as possible but if in case you are facing problems in any step please feel free to post your queries below. I would love to help as soon as time allows. I hope this cool headline news ticker may help you in generating extra pageviews and creating better user engagement. If you liked this plugin and want a similar plugin to be developed for wordPress blogs using the WP rest API, then please post your comments below. Have a great day buddies! =)  |


